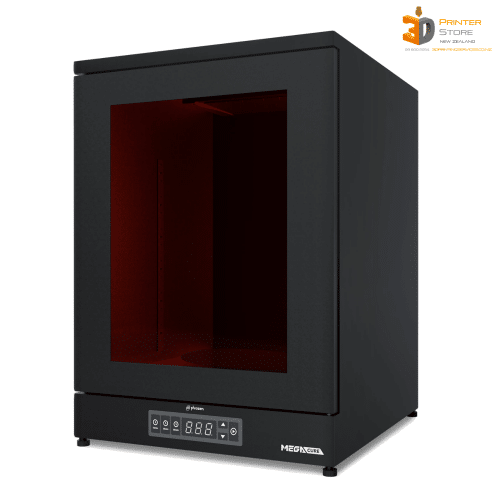
Tech Specs:
- Build Volume 8K: 330 x 180 x 400mm.
- XY Resolution 8K: 43 microns.
- Z Resolution 8K: 10 microns.
- Pre-Calibrated Building Plate: All Sonic Mega 8K building plates will be calibrated perfectly before they are shipped, which means that all you need to do is take your device out of the box and you’re all set to begin printing!
- Dual Linear Rail & Ball Screw Design: For an ultra-stable Z-axis, Sonic Mega 8K adopts this specific design so that large and heavy objects can be printed with no wobbling.
- Full Metal Exterior: Phrozen Sonic Mega 8K is made completely of metal. This strengthens the entire structure, making it stronger, and much more sustainable for long-term usage.
- Max Print Speed: Up to 70 mm/hour.
- Sliver Software: ChituBox included.
- Optical Evenness: Uniform intensity > 95% surface area.
Built on the platform of the Amazing Phrozen Transform Fast editition machines, the latest model from Phrozen conitues to push the boundaries of LCD resin printing & cemets Phrozen as the Innovators in this space.
Mono screens allow for faster 3d printing, & a much longer screen life, nearly 2000 hrs!
We’re making Resin 3d printing more affordable for kiwis by slashing prices on 3D Printing Resins as well as LCD 3d printers.
We also have New Zealand’s Biggest range of 3D Printing Resins in stock right here in Auckland, ready to ship or collect.
Back Order Special Deal
These machines are extremely sought after so there is a backlog at the Phrozen factory.
We get shipments every 6 weeks.
If you buy a unit from our backorder special, there is a discount in-lieu of the waiting.
Please expect 1 month delay from the time you place the order.
We’ll assign you the next available unit to you as per the back order list.
If we have one from an earlier batch or if the shipment lands sooner, we’ll surely send the machine over asap.
Important Notes about Post Curing & Safety:
You must ensure all the liquid resin is washed off from the printed part. For this, we recommend using an ultrasonic clener as it does this very fast, without you having to clean the part by hand or be exposed to any cheaners.
After the liquid from the surface is cleaned off, the part should be post cured so that it is compeltely tack free & ready for use.
Without proper curing, prints can easily fail. Don’t let your models fail at this crucial stage.
Cure your models in the chamber and with a click of a button, your models will be properly cured.
Some people believe it is perfectly fine to cure with sunlight.
This is commonly believed in places that have Ozone holes, or are generally hot.
Though sunlight has UV in it, there is very less intensity of 405nm wavelenth UV that is needed to cure 3d prints.
The correct UV wavelength is able to penetrate part surface, sunlight can not.
Sunlight will also heat up your model much more than the UV you would get to polymerise the liquid.
Enough UV to give you a tan or a sun burn, sure. But to cure a 3d print – not really.
Curing in the sun heats up models unevenly, & causes distortion.
A curer rotates as it exposes UV, thereby raising the part temperature evenly.
This rise improves the interlayer adhesion & creates strong components that exhibit the qualities the resin makers expected you to achieve.
But heat up parts the wrong way & they will crack.
A poorly cured part is not a safe practise – you don’t want these monomers floating everywhere long term.
Curing 3d printed parts correctly is important for safety so that things are not contaminated.
People are safe to touch them without gloves when parts are fully cured.